
Our Blog DevOps
Integrating Lighthouse CI into GitHub CI/CD Workflow

Written by: Steven Brown
December 13, 2024
Integrating Lighthouse CI into GitHub CI/CD Workflow
Introduction
Lighthouse CI (LHCI) is a powerful tool for continuously monitoring your web application's performance, accessibility, best practices, SEO, and other key metrics. By integrating LHCI into your GitHub CI/CD pipeline, you can automatically audit every pull request, ensuring that your application's quality and performance remain consistent over time.
This guide provides a step-by-step walkthrough for setting up Lighthouse CI in a GitHub Actions workflow, using a Next.js application as an example.
Prerequisites
-
GitHub Account: Ensure you have a GitHub account and access to the repository where you want to integrate LHCI.
-
Next.js Application: If you don't already have a Next.js project, you can create one using the following command:
npx create-next-app@latest
Step 1: Configure Lighthouse CI
Create an lighthouserc.json configuration file in your project root. This file tells LHCI what to audit and how.
{
  "ci": {
    "collect": {
      "url": ["http://localhost:3000/"],
      "numberOfRuns": 3,
      "startServerCommand": "npm start"
    },
    "upload": {
      "target": "temporary-public-storage"
    }
  }
}
Key Sections:
collect: Specifies URLs to audit, the number of runs, and commands to start the server. You can test multiple URLs, each separated by a comma, which is useful for testing high-traffic pages.upload: Defines where results are stored. Usetemporary-public-storagefor a quick setup. Reports stored in temporary public storage are available for seven days.
Step 2: Add GitHub Actions Workflow
We will create a GitHub workflow that triggers on every pull request to the main branch. This includes opening or modifying a PR. Create a new workflow file in your repository:
File: .github/workflows/lighthouse-ci.yml
name: Lighthouse CI

on:
  pull_request:
    branches:
      - main

jobs:
  lighthouseci:
    runs-on: ubuntu-latest

    steps:
      - uses: actions/checkout@v3
        with:
          ref: ${{ github.event.pull_request.head.sha }}
      - uses: actions/setup-node@v3
        with:
          node-version: "22"
      - run: npm install && npm install -g @lhci/cli@0.14.x
      - run: npm run build
      - run: lhci autorun
        env:
          LHCI_GITHUB_APP_TOKEN: ${{ secrets.LHCI_GITHUB_APP_TOKEN }}
Note: This assumes your project is in the root directory. If it is not, you can adjust the working directory for the job by setting:
defaults:
  run:
    working-directory: ./nextjs
Key Sections:
action/checkout@v3: Checks out the repository so the workflow has access to the codebase.actions/setup-node@v3: Configures the workflow to use the specified version of Node.js.run: npm install: Installs the project dependencies.run: npm run build: Builds the project, ensuring it is production-ready.run: lhci autorun: Executes the Lighthouse CI workflow. TheLHCI_GITHUB_APP_TOKENis required for uploading reports and is stored securely in your repository's secrets.
Including your LHCI_GITHUB_APP_TOKEN and the following steps is optional, but it greatly enhances the convenience of this workflow as you won't have to dig through the job report to find and access the Lighthouse CI report link.
Step 3: Integrate Lighthouse CI
The Lighthouse CI app can be installed from: Lighthouse CI GitHub App
To maintain security, allow the app access only to the repository it needs.
Once installed and authorized, you will be redirected to a page with your secrets token. Be sure to copy this token, as you will need it in the next step. Do not lose it!
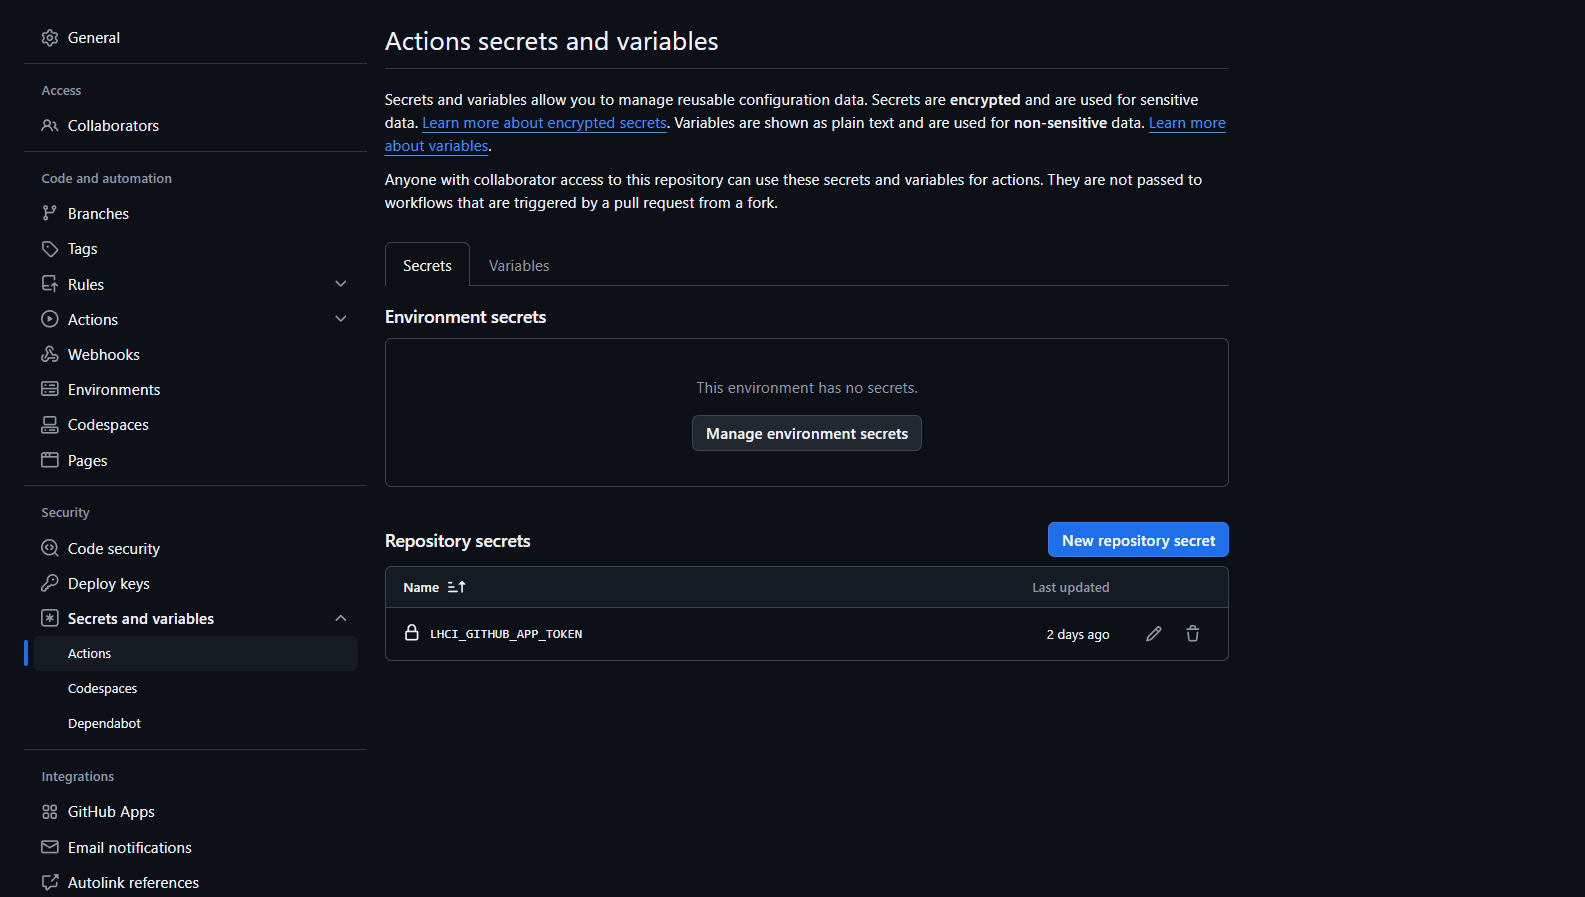
Step 4: Set up your LHCI_GITHUB_APP_TOKEN environment secret
While attempting to set this token as a build environment secret, I encountered issues. If you find a solution for this, let me know so I can update this document!
Instead, set it as a Repository secret. You can do this under:
Project > Settings > Secrets and Variables > Actions > Repository Secrets
Save the variable name as LHCI_GITHUB_APP_TOKEN and ensure you copy and paste the entire secret value from Step 3 without any extra spaces.
Step 5: Commit & Push
The hard work is done! Save any changes, commit, and push them to the main branch. This will make the workflow live and ready to use.
If this is an existing project, once you push to main, you can skip to step #6. If not, you will need to set up your project on GitHub.
Creating a new GitHub Repository
Sign in to GitHub here: GitHub
Go to New > New Repository.
Once you have named it, follow the steps on the following screen for creating a new repository on the command line.
Once you have done that, add all the files we changed to staging using:
git add -a
Commit the files using:
git commit -m "Create LHCI workflow."
Then push using:
git push
Step 6: Test the workflow
Now that we have the workflow created, let's test it out.
First, checkout a new branch:
git checkout -b dev/test-lhci-workflow
Modify any file of your choosing. You can do something simple like deleting a word from the README.md. Make sure you save the file once the change has been made.
Stage the changes and commit:
git add -a
git commit -m "Testing lhci workflow"
Next, push the change:
git push --set-upstream origin dev/test-lhci-workflow
Now we need to open our Pull Request on GitHub. Navigate to your repo, and you should see a tab for pull requests. Press the tab and click the button for New Pull Request.
It may take a few seconds, but the workflow should kick off. You should see:
Lighthouse CI / lighthouseci (pull_request) In progress — This check has started...
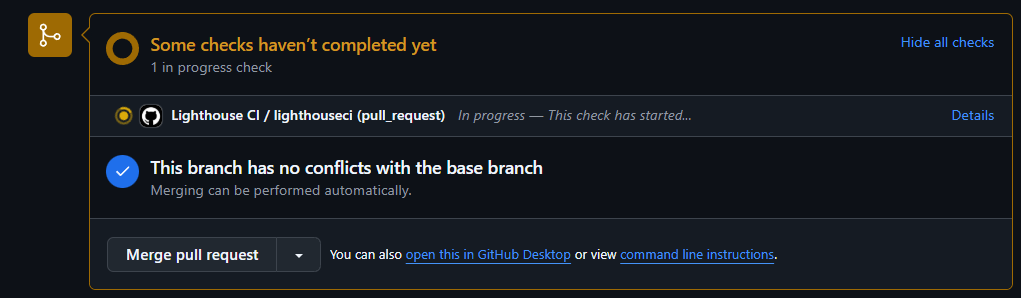
After a minute or two, the process should complete:
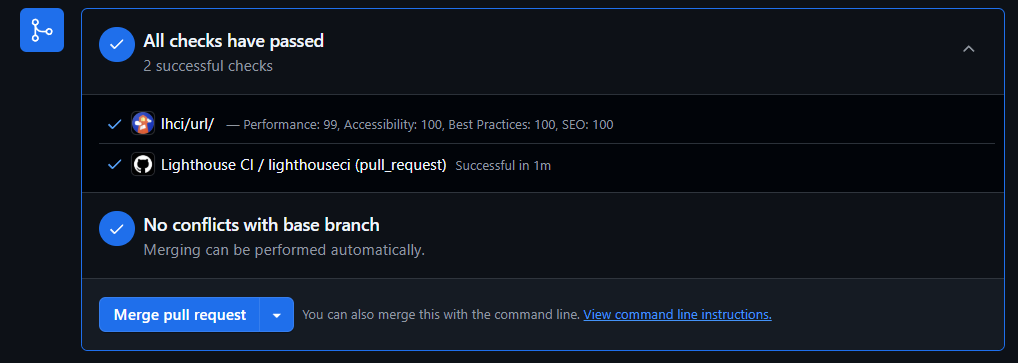
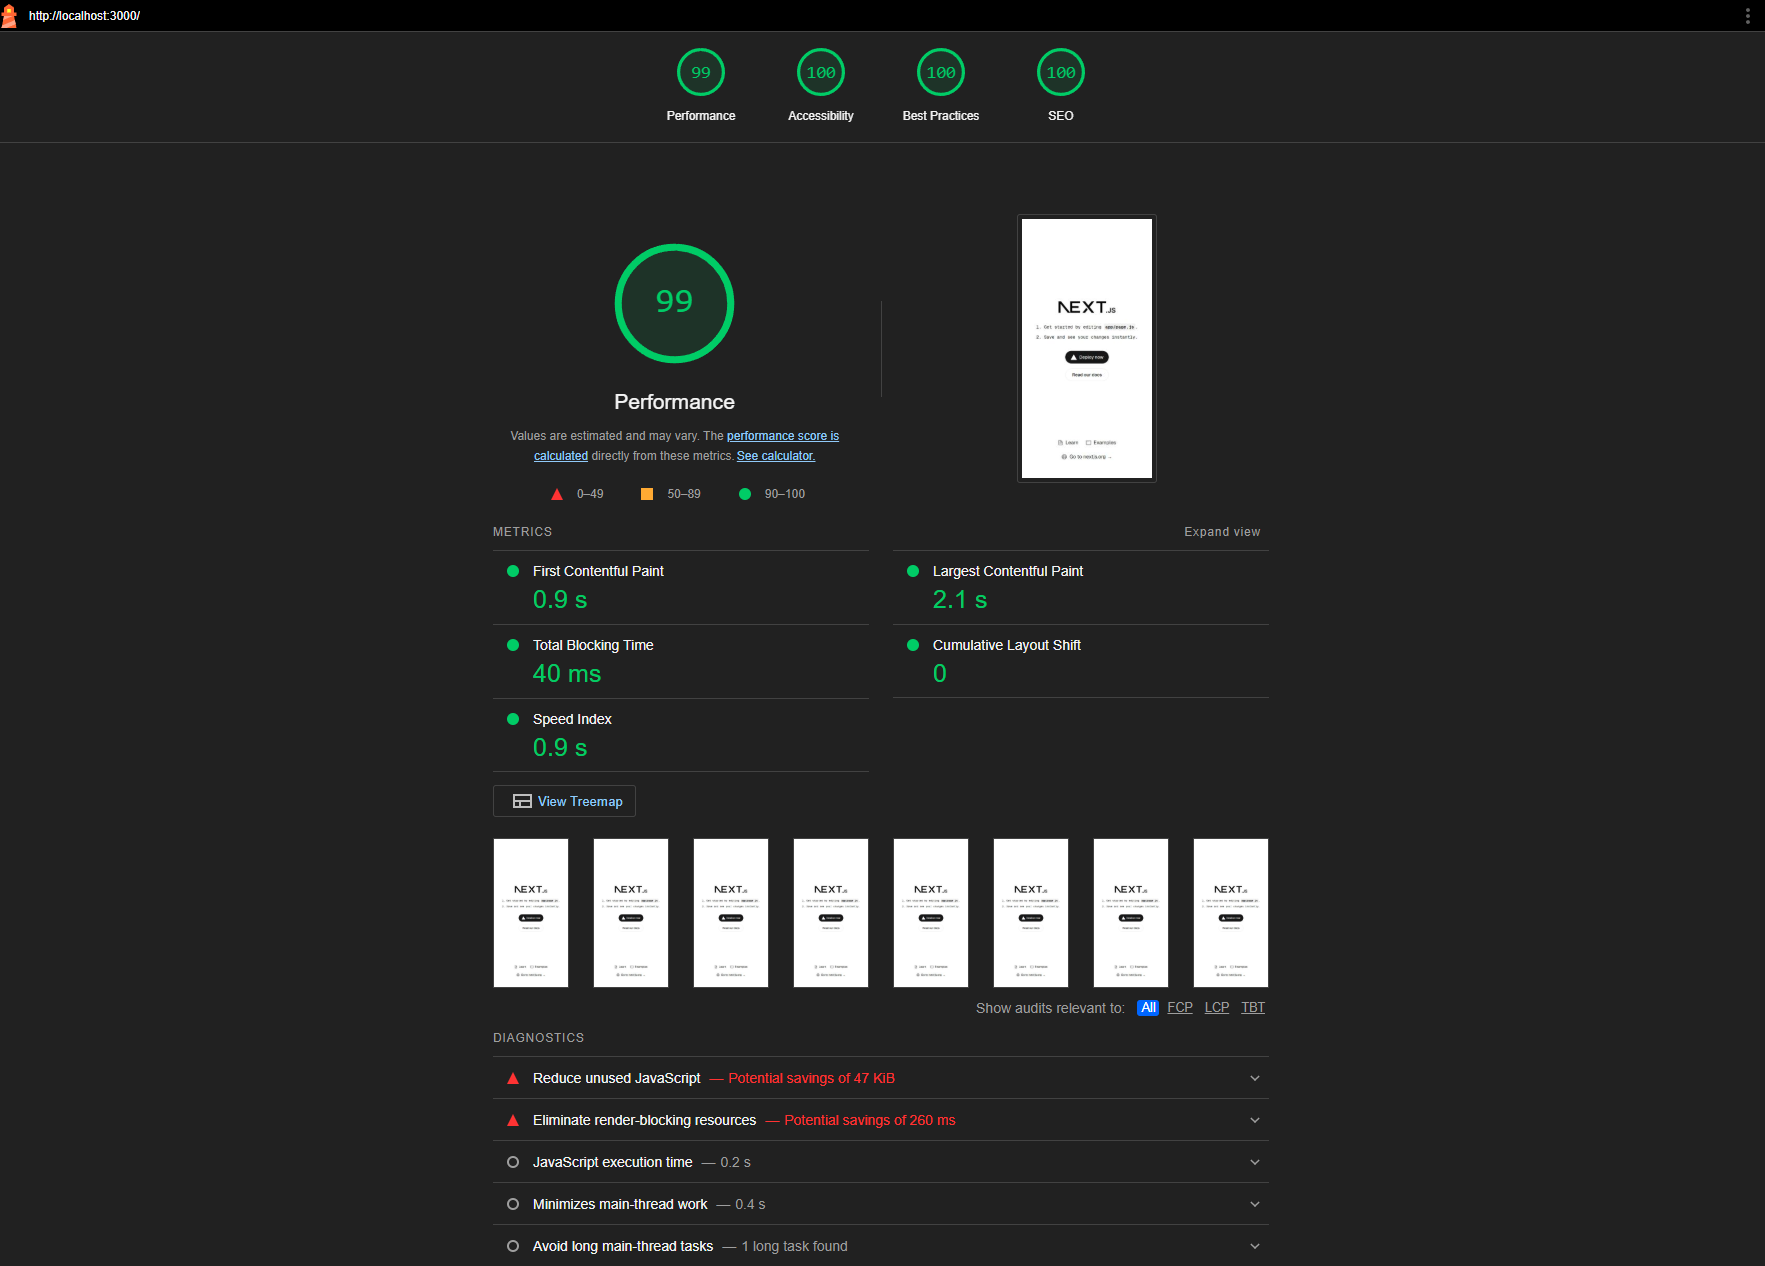
If you followed Steps 3 & 4, you can click the link, and it will bring you directly to the report:
Conclusion
This tutorial was meant to get you started with integrating LHCI into GitHub Actions. At this point, you have a report for mobile optimizations. I recommend you continue to experiment using the official docs as a reference.
By integrating Lighthouse CI with GitHub Actions, you ensure your application maintains high-quality metrics. This automated approach catches regressions early and helps deliver a better user experience. Consider extending this setup with additional CI checks or storing results for historical tracking.
Sample Project
I created a sample project here: Sample LHCI Project that you can use as a reference or to take a quick look at what the Pull Request results look like: Sample Pull Request
TLDR
Add this code to the project root:
File: ./lighthouserc.json
{
  "ci": {
    "collect": {
      "url": ["http://localhost:3000/"],
      "numberOfRuns": 3,
      "startServerCommand": "npm start"
    },
    "upload": {
      "target": "temporary-public-storage"
    }
  }
}
Then add this file to your GitHub Workflow:
File: .github/workflows/lighthouse-ci.yml
name: Lighthouse CI

on:
  pull_request:
    branches:
      - main

jobs:
  lighthouseci:
    runs-on: ubuntu-latest

    steps:
      - uses: actions/checkout@v3
        with:
          ref: ${{ github.event.pull_request.head.sha }}
      - uses: actions/setup-node@v3
        with:
          node-version: "22"
      - run: npm install && npm install -g @lhci/cli@0.14.x
      - run: npm run build
      - run: lhci autorun
        env:
          LHCI_GITHUB_APP_TOKEN: ${{ secrets.LHCI_GITHUB_APP_TOKEN }}
Authorize the Lighthouse CI GitHub App.
Set your LHCI_GITHUB_APP_TOKEN with the provided secret.
Steven Brown
Software Engineer
I am a Software Engineer based in the United States, passionate about writing code and developing applications. My journey into tech followed a unique path, beginning with a 9-year enlistment as a Russian Cryptologic Linguist in the US Army. This experience has fueled my unwavering commitment to excel in all aspects of software engineering.